Microsoft in the news
- Did you know Microsoft makes a
desktop computer?
As many of you know, I live and work on my Surface Book
laptop. I have had it for almost a year
now and if it were ever lost or stolen, I would not hesitate to buy another
one. I have put it through its paces in
numerous ways and in numerous environments and it has never even hinted that it
might let me down.
About four months ago, Microsoft introduced their first
desktop computer – the Microsoft Surface Studio. Like their tablet and Surface Book, it isn’t
for everyone since it too is priced for high end users who are not faint of
heart. Starting at $2,999 US, there are
many people who will quickly give it a pass.
However, if you are looking for a high-end computer, you are now aware
of this one.
It comes with a 28-inch touch screen display, wireless
keyboard, wireless mouse and a Surface Pen that magnetically clips to the side
of the screen. The screen folds down to
only 20 degrees so you can use it like a tablet.
I don’t have one myself, but from what I have seen of the
reviews, people love it. If it is
anywhere close to the quality they put into their Surface Book, it would
definitely be worth looking at if you are looking for a high-end desktop. There are lots of videos on YouTube and lots
of reviews out there. So, don’t just
take my word for it.
Azure Data Catalog – Asset
Tiles
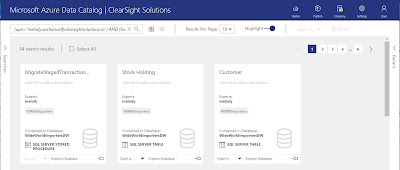
In my last post, we looked at the Tool bar. Although the tool bar dominates the
real-estate at the top of the page, the majority of your window consists of the
tiles that display your assets. These are located conveniently in the middle of
the page
Each tile in the main section of the page is an asset. An asset is any object that is a part of the
data source. When we first registered a data source, Data Catalog reads the
meta data and creates the tiles to represent the assets. Let’s take a closer look at what details are
in each of these tiles.
When you click on a tile, you will see a small check box
appear in the top right.
Here highlighted in blue is the check box. Once the tile is clicked it will show the
check mark and open a details panel.
There is a lot of information in the details panel, so we will cover
that in a separate post.
The first line of the tile is the name of the asset that was
registered; in this case “Customer”. This name was automatically pulled from
the meta data in the source.
The next line is a handy click tile to add a description message.
It invites you to click on it to present you with the same details panel that we
will discuss in my next post.
By denoting myself as the expert on this source, when data
catalog created the tile, it saved me typing the information by automatically listing
me as the expert.
Below this is the name WWWImporters. This is the tag I entered during the
registration process. I only entered one
but I could have entered as many as were appropriate to every asset in the data
source.
In this case, our
source is the database WideWorldImportersDW, a data warehouse in SQL
Server. The type of source below the
name.
On the bottom row are some action items. The first is Open In… this is the where
you can choose to view the data in a separate application.
The ability to view this data is only available to you if have
access to the original source.
The middle menu, Explore
Database, opens a new window
which gives you additional information about the source of the data. In this case a database.
The details window gives you a high-level overview of all
the assets in the source. In this case,
it tells you there are 29 tables and 24 stored procedures in the database. The ß Back to Catalog link
at the top of the box allows you to easily go back to your tile view.
On the far right of the tile there is a pin. By choosing the pin, Data Catalog will pin
the asset tile to your application page.
This makes it very easy to find later and gives you quick access to the
assets you use often.
My next post will look at the detail in the information
panel.


No comments:
Post a Comment